
Lab Door Installation: Three Seals That Decide Pass or Fail
A laboratory in a new research building was ready for commissioning. The lab doors were correct on paper: 900 mm stainless leaves, vision panels, closer arms, the right lock sets. The HVAC balance had been signed off. The wall panels were up. Then the room failed its pressure test. Air was moving in at the bottom corner of the door and drawing in along the corridor side of the frame. The leaf itself was fine. The three seal lines around it were not. Fixing them meant pulling trim, re-foaming the frame, resetting the bottom seal, and re-testing after the sealant cured. The project lost a week, and the qualification visit did not move.
That scenario is common because the parts of a lab door that get specified are not the parts that get installed. The quote describes the leaf. The pressure test judges the interfaces. This article walks through the three seal lines that decide whether a door passes, and what to check at each one before the wall closes.
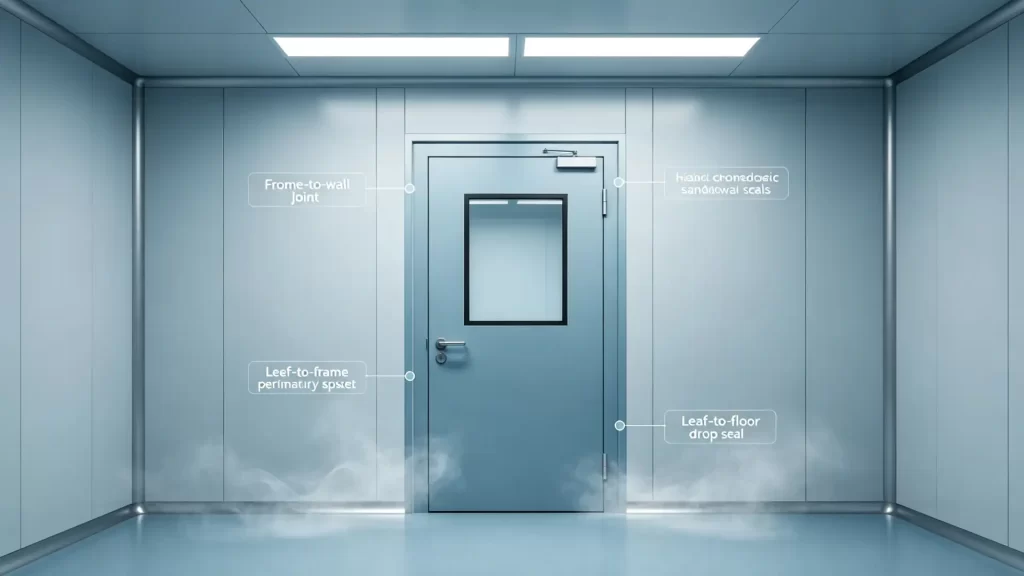
What the three seals are
A lab door is a movable section of a pressure boundary. Air will find any opening in that boundary, and it does not care whether the opening sits in the leaf, the frame, or the floor. For practical purposes there are three places to check:
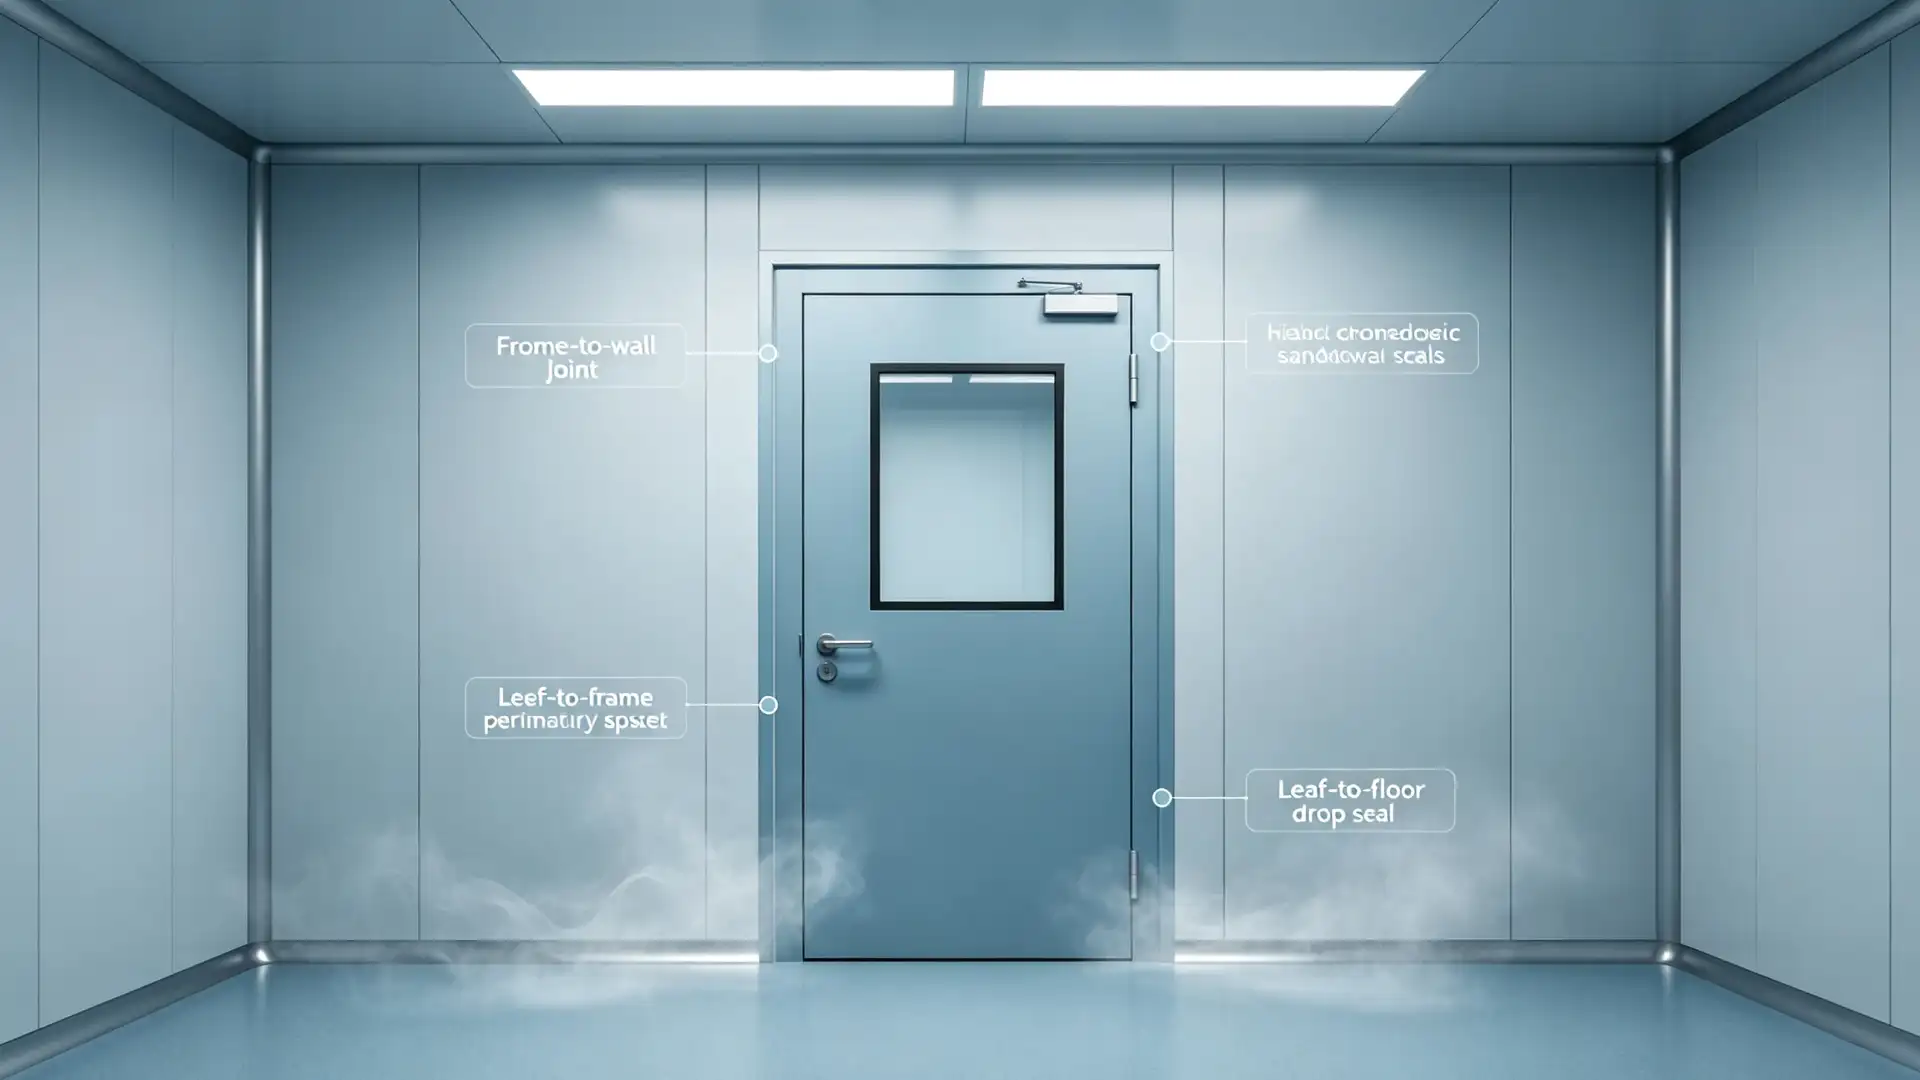
- The frame-to-wall interface, where the door frame meets the cleanroom panel
- The leaf-to-frame interface, where the perimeter gasket is compressed
- The leaf-to-floor interface, where a drop seal or threshold closes the gap
Most door problems get blamed on the leaf, because the leaf is the part everyone can see. In practice, the two hidden lines cause more failed tests than the leaf does. A stainless leaf with a good gasket will still leak if the frame was foamed against a panel of the wrong depth, or if the bottom seal was left off the order as an optional accessory.
The rest of this article treats each line in the order a contractor meets it on site: frame first, then leaf, then floor. At the end are the tests that reveal which line is leaking, and the small mistakes that account for most rework.
Seal one: where the frame meets the wall
This is the line nobody sees once the trim is on, and it is the one most often installed badly. Cleanroom walls are usually composite sandwich panels, not drywall. Panel thickness on lab projects commonly runs from 50 mm to 200 mm, and the door jamb has to match that depth and tie into the panel edge. A frame built for a 100 mm wall will not seat properly in a 150 mm or 200 mm panel. You can hide the mismatch with filler and trim, but the air path behind the trim stays open.
That matters because the frame-to-wall joint is a continuous seam around the whole opening. A void the size of a pencil at one corner is enough to show up in a pressure-decay test. Sealant applied only on the visible face does not close a void behind the frame. The joint needs to be filled through its depth, continuously, with no gaps at the corners where two panel runs meet.
A few checks before the frame goes in:
- Confirm the actual panel thickness on site, not the number in the generic drawing.
- Match the jamb depth to that thickness, or order a custom jamb before the wall is built.
- Set the frame plumb and square before foaming. Foam is not a shim, and a frame adjusted after the sealant cures will crack the seal.
- Inspect the gap around the full perimeter before the trim closes it. This is the last chance to see the joint.
If your wall build-up falls outside the supplier's standard jamb range, treat the frame as a custom item even when the leaf width is a common number. The seal lives at this interface, so the interface is what has to be specified.
Seal two: the leaf-to-frame gasket
Once the frame sits correctly, the next line is the perimeter gasket. This is the seal people think of when they hear the words airtight door, and it is the one most likely to be adjusted incorrectly on site.
The gasket works only when it is compressed evenly along its whole length. A leaf that latches tightly at the handle side but hangs loose at the top hinge will pass a casual hand check and fail a smoke test. During installation, close the leaf slowly and watch the gasket compress. Look for a consistent line of contact at the head, both jambs, and the meeting stile. If one edge compresses hard while another barely touches, adjust the hinges and the strike before you touch the gasket.
On double-leaf lab doors, the meeting stile is its own seal line. The two leaves do not simply meet in the middle; a central gasket or astragal closes the joint between them. Teams sometimes count a double leaf as twice the clear width of a single and then wonder why the passage measures short. The stile and the central seal take their share, and they also create a second compression point that needs adjusting.
Gasket material is a selection decision that shows up during installation. Labs that wipe doors down daily with chlorine-based or peroxide disinfectants need a gasket that tolerates repeated contact, because a hardened or cracked strip will not compress the way it did on day one. The surface treatment of the leaf matters for the same reason. Options such as HPL, stainless steel, and coated panels behave differently under repeated cleaning, and the panel choices described on the E-ZONG lab cleanroom door page are worth reviewing before the gasket is specified, not after it starts to fail.
Two practical habits help here. First, adjust the leaf with the gasket installed, not before, so the compression you set is the compression you keep. Second, re-check the hinges a week after handover. Doors settle in new frames, and a quarter-turn on a hinge at that point can be the difference between a passing and failing re-test.
Seal three: the gap under the leaf
The bottom line is where most labs break their own rules. A conventional door uses a raised threshold to close the gap under the leaf. Labs generally avoid a raised threshold because it trips people, catches cart wheels, and collects dust in a place that is hard to clean. That leaves the gap open unless something else closes it.
The usual answer is an automatic drop seal fitted into the bottom of the leaf. It stays raised while the door is open and drops when the leaf closes, pressing against the floor finish. It has to be set so the seal touches the floor across its full width without dragging hard enough to lift the leaf at the latch. Too high and it leaks; too low and the door will not close fully, which then breaks seal two.
When a lab specifies a sliding configuration, the bottom geometry changes again. A sliding leaf runs in a floor guide or a track, and the seal has to work with that guide instead of fighting it. The airtight glass automatic sliding door range is a useful reference for how a clear span and a working seal are detailed together. If the traffic pattern sends carts or gurneys through the opening, the sliding option also removes the swing arc that a wider swing leaf would need.
What you should not do is treat the drop seal as an accessory to add later. Decide the floor condition, the cleaning method, and the bottom seal type at the drawing stage. A seal added after the leaf is hung usually means drilling into a finished panel, and that is how a cleanable door acquires a new place for dust to sit.
How the three lines work together
A pressure boundary does not grade the three seals separately. The room holds or it does not, and one weak line undoes two good ones. This is why a door can look perfect and still fail commissioning: the leaf is straight, the gasket is new, and the frame has a hidden void at the top corner.
The interaction also explains why a door that passed on installation day can fail months later. A gasket compresses and takes a set. A drop seal wears at one end. A frame sealant bead shrinks away from a panel edge. Each change is small, and the room only tells you about it when the differential starts to drift or recovery takes longer after each open cycle. For a broader look at why the door is part of the contamination strategy rather than a finish item, see how the clean room door affects contamination control.
Door type changes the balance between the three lines. A swing leaf relies heavily on the perimeter gasket and the bottom drop seal. A hermetic leaf adds a mechanism that pulls the door into the frame on closing, so seal two is doing more work. A sliding leaf moves the challenge toward the floor guide and the bottom seal. None of these designs removes a seal line; they just move where the installer has to be careful.
The tests that show which line is leaking
When a room fails, resist the urge to adjust everything at once. Change one line and re-test, so you learn which line mattered. The sequence below follows what commissioning teams can observe without dismantling the door.
Start with a pressure hold or decay check on the room with the door closed. If the room cannot reach or hold its set point, confirm the HVAC balance first, then work around the door. Walk a smoke pencil or a similar visual aid slowly along the top of the frame, both jambs, the meeting stile, and the bottom edge. Air movement at the frame points to seal one. Movement at the gasket line points to seal two. Movement at the floor points to seal three.
Next, cycle the door ten or twenty times and watch recovery each time. A door that holds when closed but slows recovery after every opening often has a bottom seal that is not resetting, or an interlock that allows the next door to open before the room has settled. Check the latch and strike alignment at the same time, because a leaf that does not fully latch cannot compress its gasket.
Finally, record what you find. A commissioning result without a note about which seal was adjusted is hard to defend at an audit. The documentation habit matters as much as the adjustment, especially on projects where qualification evidence is reviewed line by line. The selection framework for chemical, biotech, and testing lab doors explains how environment type changes the sealing and cleanability requirements, which is useful context when you write those notes.
Installation mistakes that cause the most rework
These are the errors that turn a correct door into a failed test. None of them are visible in a product catalog.
- Foaming the frame after the panel joint is closed, leaving a void that cannot be inspected or filled.
- Assuming a standard jamb fits a 150 mm or 200 mm panel wall, then covering the mismatch with trim.
- Trimming a gasket so the latch catches, instead of adjusting the hinges that compressed it unevenly.
- Fitting a raised threshold on a route that carries carts, then removing it and losing the bottom seal.
- Testing the room before the frame sealant has cured, and chasing a leak that only existed during cure.
- Skipping the hinge re-check after the first week of use.
- Treating the drop seal as an optional extra and discovering the gap at commissioning.
- Letting the wall contractor and the door contractor work from different drawings of the same opening.
A common thread runs through most of them: the door was treated as a line item rather than as part of the pressure boundary. The fix is not more product. It is one confirmed drawing that shows the leaf width, the jamb depth, the gasket detail, the bottom seal, and the floor condition in the same view.
Getting the drawing right before install day
The drawing is where a lab door either becomes a good installation or a difficult one. It should show the leaf width and thickness, the jamb depth matched to the panel, the perimeter gasket and meeting stile detail, the bottom seal type, the floor finish, and the hardware that will operate the leaf. It should also state which room classification the opening serves, because that drives how carefully the seals will be tested.
Send the room classification, the wall build-up, the widest item that will pass through the doorway, and the traffic pattern to the supplier before the order is placed. A supplier who works from those four inputs can confirm the jamb and the seal package in one pass. A supplier who receives only a leaf width will give you a price, and the interfaces will be worked out on site, where mistakes cost more.
E-ZONG builds lab and cleanroom doors in swing, sliding, hermetic, and airtight configurations, with customization for non-standard widths, jamb depths, and panel interfaces. The point of sending the full specification is not to buy more door. It is to arrive at installation day with three seal lines that were designed together and can be tested together.
FAQs
Can a good leaf compensate for a bad frame seal?
No. The frame-to-wall joint runs around the entire opening, and a void at one corner will show in a pressure test even with a high-grade leaf and gasket.
Is a raised threshold ever acceptable in a lab?
Where the route carries no carts and the protocol allows it, a gated threshold can work. Most active lab routes avoid it because it catches wheels, trips people, and is hard to clean.
How do I know if the bottom seal is set correctly?
Close the leaf and check that the seal touches the floor along its full width without stopping the door from latching. Then cycle the door and confirm the seal resets each time.
Should a double-leaf lab door seal differently from a single leaf?
Yes. The meeting stile adds a center seal that needs its own adjustment, and the clear width is less than two single leaves added together.
What should be recorded at commissioning?
The pressure result, the smoke check observations, which seal line was adjusted, and the date of the re-test. Those notes are what an auditor will want to see if the room later drifts.
Take the three seals to your supplier early
A lab door passes or fails at its interfaces, not on its spec sheet. Confirm the frame depth against the real wall, set the gasket for even compression, and give the bottom seal a place in the drawing. Send your room classification, wall build-up, floor condition, and traffic pattern to E-ZONG for a confirmed door and seal drawing. Getting the three lines right once is cheaper than opening a finished wall to fix them.
-
 Cleanroom Glass Windows Are The Key to Maintaining a Clean Environment
-
 Top Aluminium Profile Manufacturers in China: Leading the Global Market
-
 The Evolution of Air Tight Sliding Doors
-
 AHU Aluminium Profile: A Comprehensive Guide
-
 The Importance of Choosing the Right Cleanroom Door in Vietnam
-
 The Benefits of Hospital Automatic Doors: Enhancing Efficiency and Safety
-
 The Best Bathroom Door Manufacturers - Unlocking Endless Possibilities!
-
 Unlock the Possibilities with AJ Manufacturing Doors
-
 Make a Statement with Manufactured Home Interior Doors!
-
 what is aluminum profile? Aluminum Profiles for Your Home is the best option
-
 Lab Door Installation: Three Seals That Decide Pass or Fail
-
 Standard Door Width vs Custom: When Standard Falls Short
-
 Biotechnology Cleanroom Design: Zoning That Protects Process
-
 Airtight Door Room Map: Avoid Leaks Before the Audit
-
 Clean Room Airlock Not Holding Pressure? 6 Causes and Fixes
-
 Hospital Door Standards: NFPA, IBC, EN, and GB Compared
-
 Cleanroom Doors: Buyer's 15 Specs to Confirm Before PO
-
 Operating Room Door Spec: 7 Requirements Hospitals Must Meet
-
 Laboratory Door Pressure: Positive vs Negative and Drop Seal
-
 Shielding Door Lead Equivalent: Match mmPb to Your Room Type





-

Home
-

Tel
-

Email
-

Contact


Guangzhou Yizhong Aluminum Industry Co., Ltd.
We are always providing our customers with reliable products and considerate services.
We are always providing our customers with reliable products and considerate services.
Speak Your Mind